
Newspack Newsletters allow you to create and send email newsletters directly from Newspack to your ActiveCampaign, Constant Contact, or Mailchimp, without leaving the platform.
Installing the plugin
If “Newsletters” doesn’t appear in the left navigation on the back end, install and activate the plugin.
- Go to Plugins.
- Find Newspack Newsletters listed in the plugins to install under Newspack.
- Select Install, then search for it again and Activate.
If you’re not using Newspack, download the Newspack Newsletters plugin, upload it to your WordPress site, and then Activate it.
Adding API keys
Once the plugin is activated, add the API keys for your email service provider. Newspack Newsletters supports Active Campaign, Constant Contact, Mailchimp, or a “manual” provider, which allows you to copy the email code for use with any other provider.
Add your API keys by following these steps:
- Go to Newsletters > Settings.
- Select your email service provider from the card grid at the top of the page:
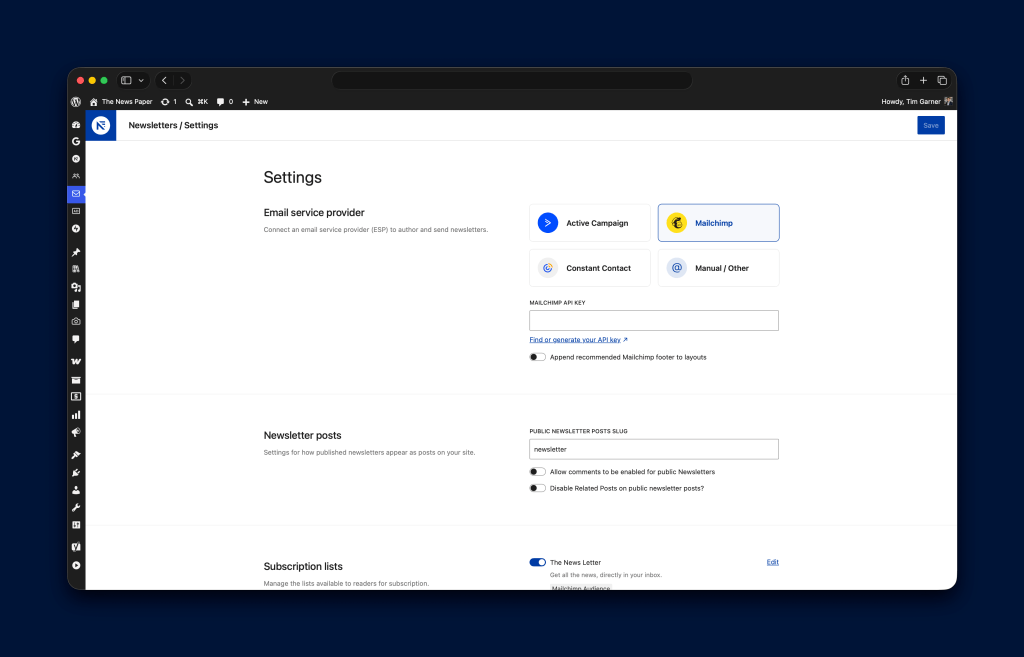
- Fill in only the information relevant to the provider you selected. The credential fields will appear below the card grid once a provider is selected.
- Active Campaign: Enter an API URL and key. Find more details here.
- Constant Contact: Enter a Constant Contact API key and API secret. Follow these instructions to obtain them here.
- In the Redirect URI settings, add the following URLs to authorize your site’s API connection:
https://<your-site-url>andhttps://<your-site-url>/wp-admin/index.php?cc_oauth2=1
- After saving your API credentials and redirect URIs, save the credentials on your site’s Newsletters Settings page and click the Authorize button that appears below the credential fields.
- In the Redirect URI settings, add the following URLs to authorize your site’s API connection:
- Mailchimp: Enter a Mailchimp API key. To get this, log into your existing Mailchimp account or sign up for a new one, and select the Generate Mailchimp API link below the text field. You can learn more about Mailchimp API keys here.
- Select Save in the top-right header.
Now you’re ready to create newsletters. To access these settings again, go to Newsletters > Settings to make changes.
Managing subscription lists
Subscription lists are the lists to which readers can subscribe. When you enter your email service provider’s credentials in your settings, Newspack Newsletters pulls all of the lists you have set up into Subscription Lists. (In Mailchimp, these are called “Audiences.”)
You will be able to manage your Subscription Lists under Newsletters > Settings, in the Subscription Lists section.

Each list is shown as a row with a toggle to enable or disable it. Toggling a list on or off takes effect immediately—there is no separate Save button for the list toggle. To update the name or description of a list, click the Edit button on that row to open an editing panel.
Note: If you are using the Manual / Other provider, the Subscription Lists section will not be shown, as this provider does not support list management through the plugin.
The lists you enable will be available to use in the Newsletter Subscription Form block.
Using lists in the Newsletter Subscription Form block
The Newsletter Subscription Form block can be added to any post or page. This block works with every email service provider that’s integrated with Newspack.

In the block’s settings, in the Subscription Lists section, you should see toggles for any lists that have been pulled into Newsletters and enabled.
On the front end of the site, readers will see checkboxes to select lists you have enabled, allowing them to choose which of your email lists to join. Once a reader signs up for one or more Subscription Lists, they will be added to your email service provider under the corresponding Lists or Audiences.
Note: You can use as many Newsletter Subscription Form blocks on your site as you need. Each one can be configured to offer different Subscription Lists to readers.
Creating additional subscription lists
If you are using Constant Contact or Mailchimp, you can create additional lists that will be tied to Tags in your email service provider. This means you don’t need to have a full List or Audience in your email service provider to correspond to a Subscription List.
Note: For ActiveCampaign, you must segment your audience at the ActiveCampaign interface, and it will be synced to Newspack.
To create a new local subscription list:
- Go to Newsletters > Settings and scroll to the Subscription Lists section.
- Click Add new local list.
- In the panel that opens, give your list a name and an optional description.
- Select the parent Audience (Mailchimp) or List (Constant Contact) from the dropdown. This is the top-level audience in your ESP that the local list will be a tag or group within.
- Click Save to create the list.

Once created, your new list will appear in the Subscription Lists section and can be enabled with the row toggle. You can edit or delete it at any time using the Edit and Delete buttons on its row (Delete is only available for local lists, not for lists pulled in directly from your ESP).
Subscription Lists created this way will appear labeled to distinguish them from top-level ESP lists (e.g., “Mailchimp Group under the Newspack Newsletters category”).
Beyond these differences, Subscription Lists you create work exactly the same way as the other lists that are automatically pulled in from your email service provider.
ESP-specific considerations
Each email service provider treats lists/audiences, segments, and tags differently. These are some of the most notable differences.
ActiveCampaign and Mailchimp: After creating a local Subscription List, you will only be able to see the corresponding tag in the ESP dashboard if there’s at least one contact added to it.
Constant Contact: For these ESPs, you may send to either a List or a Segment. These sending options are mutually exclusive in those ESPs.
Mailchimp: You must select an Audience to send to before you’re able to select a group, segment, or tag. In Mailchimp, groups, segments, and tags are tied to a specific audience.
Newsletter layouts
Newspack Newsletters comes with nine example layouts to use as a starting point for your newsletters. You can use these layouts, edit them, or start with a blank slate to create your own. All layouts—both the built-in examples and any custom ones you save—are accessible from Newsletters > Layouts, where they are displayed in a grid with previews.

Using layouts
When creating a new newsletter, you will be prompted to choose from existing layouts or start with a blank editor:
- Go to Newsletters > All Newsletters and click Add New Newsletter.

- A layout picker will appear showing available layouts as a grid with previews. Each prebuilt layout includes instructional filler content and will use the logo set under Customizer > Site Identity for the newsletter header.
- Select the layout you would like to start with and click Use Selected Layout to begin editing your newsletter.
- Alternatively, if you want to start from scratch, select Blank Newsletter.
Once you make your selection, you will be taken to the editor.
Adding layouts
There are a few ways to create custom layouts:
From the Layouts screen
Go to Newsletters > Layouts and click Add New Layout. This opens a blank layout in the layout editor. Build your layout and save it—it will appear in the grid and in the layout picker whenever you create a new newsletter.
You can also Duplicate any existing layout from the Layouts screen (useful when you want to create a variation of one you already like without overwriting the original). Look for the duplicate option in the layout’s action menu.
From the newsletter editor
If you’ve built something in the newsletter editor that you’d like to reuse as a layout:
- Go to Newsletters > All Newsletters and click Add New Newsletter.
- Pick the layout you would like to start with, or select Blank Newsletter.
- Make your changes in the editor.
- In the Settings column on the right, make sure you’re on the Newsletter tab.

- Scroll down to the Layout panel and click Save New Layout.

- Give your layout a descriptive name in the prompt that follows:

- Your saved layout will now appear in Newsletters > Layouts and in the layout picker whenever you create a new newsletter.
Editing layouts
You can edit your custom layouts directly from the Layouts screen:
- Go to Newsletters > Layouts. Your saved layouts are displayed in a grid with previews.
- Click on the layout you want to edit to open it in the layout editor.
- Make your changes. Note that the Send button is intentionally hidden in the layout editor—layouts are templates, not newsletters to send.
- Save your changes using the editor’s save controls.
Alternatively, if you’re already editing a newsletter that was created from one of your custom layouts, you can update the layout from within the newsletter editor. In the Newsletter tab of the settings column, scroll down to the Layout panel and click Update Layout. This will overwrite the original layout. If you want to keep the old version, click Save New Layout instead.

Resetting layouts
After making changes in the editor, you can roll back to your original selected layout by following these steps:
- To reset, make sure you’re in the Newsletter tab of the settings column. Note: All of your changes from that session will be lost.
- In the Layouts panel, click Reset Layout.
Building newsletters
To create a new newsletter, go to Newsletters > All Newsletters and click Add New Newsletter. You’ll be prompted to pick a layout or start with a blank newsletter—see Newsletter layouts for more on that. Once in the editor, the sections below walk through all available options.

Newsletter options
When editing a newsletter, you will have a few more options than you usually would when editing a Page or a Post. These are divided between the Settings menu and Styles menu (accessed by selecting the  icon in the top right corner).
Settings
Several panels in the Settings column are only relevant when Visibility is set to Email and web, and will be noted below.
At the top of the Newsletter tab:
- Status: Draft, Pending Review, etc.
- Publish: Default is Immediately. Click “Immediately” to schedule.
- Note: Newsletters can only contain posts that are published on the site when the newsletter is created. Nothing published between the creation date and scheduled publishing date will appear.
- Slug: The last part of the URL when the newsletter is published on your site, which defaults to your newsletter’s subject line.
- Template: Select a block template to apply to the newsletter.
- Visibility: Choose between Email only and Email and web. Email only sends to subscribers only and is not visible on your site. Email and web also publishes the newsletter as a page on your site when you send it, at a URL like
https://newspack.com/newsletters/[newsletter-slug]. Email and web newsletters also appear in category and tag archives if assigned. You can also change this setting from the newsletters list using the quick actions or the kebab menu on any newsletter row. - Pending Review: Optional for internal workflow.
- Move to Trash: Self-explanatory.
Under the Authors panel:
- Only relevant when Visibility is set to Email and web — the author will appear on the published page.
Under the Ads Settings panel:
- Covered in depth at this help page.
Under the Excerpt panel:
- Only relevant when Visibility is set to Email and web — the excerpt will appear if the newsletter is included in a Homepage Posts block with Excerpt turned on.
Under the Newsletter Campaign panel:
- Subject: The email subject line for your newsletter. By default, it will be the date you started composing your newsletter.
- Preview Text: The text that will appear in your recipient’s inbox, usually longer than the Subject.
- Campaign Name: Only seen by you internally in your email service provider.
- Folder: For internal organization in your email service provider.
- From: The name and email the newsletter should appear to be from in a recipient’s inbox. The name can be anything. The email must be associated with your website. Generally, publishers use a generic email such as
info@yourgroovydomain.com.- Important note for Mailchimp and Constant Contact users: You must click Update Sender after filling out the two fields under From, or you’ll be unable to send later.
- Send To: Displays the available mailing lists or audiences you have set up in your current email service provider.
- If you have the lists or audiences further segmented, another dropdown will appear.
Under the Testing panel:
- Send a test to: A text field for one or more comma-separated email addresses to receive a test email. Use this field to ensure your email displays as expected before sending it to a larger audience. Select Send Test to send the preview.
Under the Layout panel (more details here):
- Save New Layout: Save your current editor content as a new reusable layout. Learn more.
- Update Layout: Only available when you’ve started with one of your custom layouts; saves changes back to that layout. Learn more.
- Reset Layout: Rolls back editor content to the originally selected layout, discarding unsaved changes. Learn more.
Under the Revisions panel:
- Takes you to a two-column page of HTML, showing what was changed each time you hit Save Draft. At the top left of that page, there’s a Go to Editor button that will bring you back.
Under the Categories and Tags panels:
- This panel comes into play for advertising, with details at this help page.
- Only relevant when Visibility is set to Email and web — it will then appear in the archive page of the selected Category or Tag.
Under the Advertiser panel:
- Covered in depth at this help page.
Under the Featured Image panel:
- Only relevant when Visibility is set to Email and web — this will be the Featured Image shown in a Homepage Posts block, if images are turned on. It can be set to Hidden so it doesn’t also appear on the published page.
Styles
You can access these panels by selecting the icon in the top-right corner.
Under the Typography panel, you will have the ability to change the Headings and Body fonts in your newsletter to a different web-safe font.
Under the Color panel, you can change the background and text color of your entire email, either by using a color picker, or manually entering a hexadecimal value.
Under the Custom CSS panel you can access an advanced feature which lets you enter CSS that will be appended to the newsletter template. This way, you can provide custom styles or overwrite default template styles, if necessary.
- Any custom CSS you enter here will apply only to emails sent via your selected email service provider. The editor preview will update to show custom CSS to help with composing the styles, but because of the wide variation between email clients, it’s not guaranteed that your styles will render the same way in the sent email. We recommend sending test emails often if using custom CSS.
- If you want to apply custom styles to newsletters when viewed on your site (i.e. when Visibility is set to Email and web), we recommend using the Customizer to do so. This is because theme styles can differ substantially from newsletter styles.
Available blocks
Newspack Newsletters supports several blocks and their configurations, but there are some limitations to make sure the blocks display as expected in different email clients. The following blocks and block options are available:
- Paragraph
- Heading
- List
- Quote
- Image (without the left and right alignment)
- Buttons
- Columns (can nest one level of blocks inside)
- Group (can nest one level of blocks inside)
- Separator
- Spacer
- Social Icons (with icon support for Bluesky, Facebook, Instagram, LinkedIn, TikTok, Tumblr, Twitter, X, and WordPress).
- Embed — modified to display email compatible content. The fully-featured embed is preserved to be displayed on a published newsletter viewed on the web.
- Share — Inserts a link to the newsletter’s web page (only relevant when Visibility is set to Email and web) for easy content sharing.
- And the Post Inserter block — an email-friendly version of the Content Loop block available in Newspack. The Post Inserter block lets you add posts to your newsletters; once they’re inserted they turn into regular header and paragraph blocks, so you can edit the post titles and excerpts to target them to your newsletter audience.
Dynamic Content
Message personalization
ESPs usually accept wildcards in the message to allow you to personalize the message to the recipient.
These merge tags, or personalization fields, work out of the box without the need of any additional setup.
For example, just type Hello *|FNAME|* (for Mailchimp) or Hello %FULLNAME% (for Active Campaign) and these strings will get replaced with the recipient’s name.
Any other dynamic content should also work out of the box, like Message variables, for example.
Using the merge-tag picker
Instead of typing merge tags manually, you can use the built-in merge-tag picker to browse and insert tags from your ESP:
- Toolbar button: Select any text block in the editor. A merge-tag button (
{}) will appear in the block toolbar. Click it to open a searchable list of available tags fetched live from your ESP. - Inline autocomplete: While editing a text block, type
{}anywhere in the content to trigger an inline autocomplete menu with the same tag suggestions.
Merge tags from both Mailchimp and ActiveCampaign are supported.

Email or web blocks
If you are writing a newsletter that is going to be made public on the web, you can change a block visibility to be displayed for the email version or the web version only.
When Visibility is set to Email and web, you’ll be able to edit each block’s visibility options through the block toolbar or sidebar.

If a block is set to be visible only to a specific version of the newsletter, you should see a notice surrounding the block.
Conditional tags
ESPs also support conditional tags. This allows you to make a block visible depending on the recipient’s profile data.
To use conditional tags, select the block you want to add the condition to and add the conditions on the sidebar.

Each ESP will have a different syntax to define the condition. The sidebar will display inline examples and link to the docs in your active ESP site.
Tip: If you want to apply a condition to multiple blocks at the same time, use a Group block.
Customizing the footer
If you’re using Mailchimp, it will automatically include a footer on the sent newsletter with information about you and links to unsubscribe or forward the email.
We strongly recommend that you enable Newspack’s recommended footer for Mailchimp in the Newsletters Settings page.

See this page with more information about why this is important.
Alternatively, you can create your own footer in the newsletter editor, and as long as you include Mailchimp’s required content, it will replace the footer Mailchimp adds. Below is an example with all of the required links—the placeholders like *|EMAIL|*, *|ABOUT_LIST|*, and *|LIST:ADDRESSLINE|* will be automatically populated by information in your Mailchimp account:
This email was sent to <a href="mailto:*|EMAIL|*">*|EMAIL|*</a>.
<a href="http://*|ABOUT_LIST|*">Why did I get this email?</a>
<a href="http://*|UNSUB|*">Unsubscribe from this list</a>
<a href="*|UPDATE_PROFILE|*">Update subscription preferences</a></p>
<p>*|LIST:ADDRESSLINE|*</p>
You can learn more about Mailchimp’s email footers here.
Sending newsletters
Once you are finished editing and testing your newsletter, you will need to configure the target audience and sender information.
Choosing audiences
The way you select the audience of your newsletter varies, depending on the email service provider you are using.
ActiveCampaign
Use the autocomplete input in the Send To area to select the List that should receive the email. Once the list is selected, a new input will appear, where you can optionally select one specific Segment.
Note: ActiveCampaign has strict limits on the ways a single email campaign can be edited and sent. For that reason, email campaigns are generated in the email service provider dashboard only when sending them. So it’s not possible to save a draft in Newspack Newsletters and edit it further in the ActiveCampaign dashboard.
Additionally, the Newsletters plugin cannot automatically create an ActiveCampaign segment on the basis of a Subscription List tag created in WordPress admin. To send email to these lists, you need to first manually create a segment.

Constant Contact
Use the autocomplete input in the Send To area to select the List or Segment that should receive the email.

Mailchimp
Use the autocomplete input in the Send To area to select the Audience that should receive the email. Once the audience is selected, a new input will appear, where you can optionally select a specific Group, Segment, or Tag.

Note: Mailchimp does not support Advanced Segments to be used in automations and external integrations, so they will not be available here.
Sending your email
Once everything is set, you can select the Send button at upper right in the editor to send the newsletter to your selected mailing list.
If Visibility is set to Email and web, your newsletter will also be published as a page on your site when you send. The URL uses the Slug field from the top of the Newsletter tab. It will always be available under Newsletters, too.
Sending newsletters manually
If you selected the “manual” provider, you’ll be prompted to copy your HTML code to paste on your email service provider. Once you’ve successfully sent your newsletter, select “Mark as sent” to keep track of your published newsletters.

Newsletter UTM parameters
Links inside newsletter content authored in the Newspack Newsletters editor will automatically get certain UTM parameters appended. This can be helpful for analytics purposes. All links in newsletter content will have the following parameters appended:
utm_campaign– Matches the value of the Campaign Name field (but URL-encoded)utm_source– The ID of the top-level send list or audience the newsletter is being sent to (but URL-encoded).utm_medium=email– This will always have the valueemail.
Note that the connected ESP or other third-party integrations may overwrite some or all of these parameters with its own. For example, if using Mailchimp with the Google Analytics extension, the GA extension will set its own utm_campaign and utm_source values, overwriting our defaults.
Newsletter ads
Newspack Newsletters let you create and manage ads that are automatically injected in your emails. See this Help page for full details.